A CPU fan is one of the key parts that ensures your PC is working fine. Being able to take control of the CPU fan will help your system stay cool and quiet.
You might have noticed that your PC is overheating or becoming too loud when playing games or using demanding software.
These are some of the problems that arise when you do not have control over your CPU fan speed.
Luckily, you can ensure that your computer is running smoothly by adjusting your computer’s fan speed.
In most cases, people prefer to change their CPU fan speed in BIOS. It is the most recommended method, but it might not work all the time.
If you are having problems slowing down or increasing CPU fan speed, these methods might work for you just fine. Here’s how to change the CPU fan speed without BIOS.
Use a Fan Control Software
Even though you can choose to adjust your computer fan speeds manually, it is best to go for an automatic option. In this case, you will have to use software for fan control.
An automatic fan controller software will monitor the CPU temperatures and allow you to adjust the fan speed on your PC if the need arises.
A PC fan controller software will quietly increase the fan speed when the CPU gets too hot and turn them down when the system gets back to normal.
- 4 Methods on How To Fix CPU Fan Error on Boot But Fan is Running
- 5 Ways on How to Disable CPU Fan Error in Asus in 2022
There are plenty of programs that you can use to control fan speeds. However, choosing the right one should be your priority.
It would help if you made sure that the software you choose is compatible with all the operating systems, including Windows 10.
If you are open to using a PC fan controller software, SpeedFan should be a good place to start.
SpeedFan
If your PC’s BIOS does not allow you to adjust fan speeds, you can opt to go with SpeedFan. It is one of the free utilities that provide you with more advanced control over your CPU fans.
SpeedFan has been around for so many years, and it is still the most used software for fan control.

Despite being popular, SpeedFan is a little more sophisticated for beginners. You might not get the hang of it quickly if you are not an advanced user.
Tread carefully when using this software because it might damage your hardware if you make mistakes.
SpeedFan is not compatible with every computer, make sure you check if this software supports your computer’s chipset.
Below are some of the steps you should follow to control your fan speed with SpeedFan.
Step 1: Download & Install SpeedFan
To use SpeedFan, you’ll need to download the latest version from the official website.
Once the download is complete, install the software as you usually do and wait for it to start.
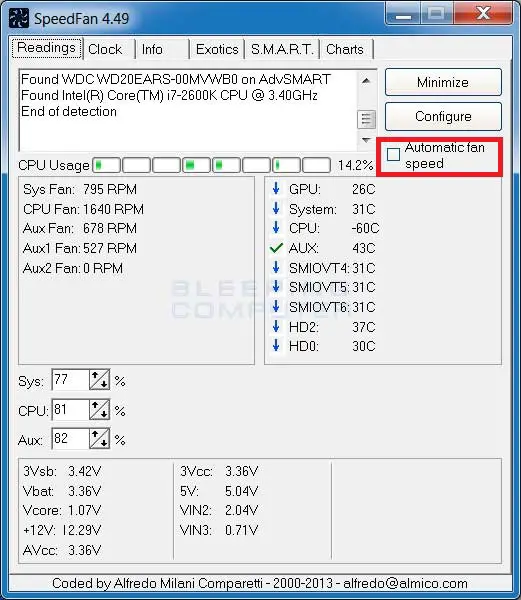
Allow the program to scan your PC so that it displays all the necessary details on the main window.
The main window will show you the RPM of your fans, a list of temperatures for your processor, motherboard chipset, graphics card, hard disk, and more.
Make sure you get acquainted with the different labels so that you know what they represent or stand for. Avoid interfering with the settings if you are not sure about them. Proceed to step 2 if you’ve gotten acquainted.
Step 2: Play With Some Fan Controls
As we mentioned earlier, SpeedFan is a bit complicated to use. Fortunately, you can choose “Automatic Fan Speed” to allow the software to control your system automatically.
This option might not always produce great results, which is why you should play around with some fan controls.
To get started, click the Configure button and then select the Advanced tab. Now choose your motherboard chipset by clicking the “Chip” dropdown menu.
Once you do that, click all the PWM Mode options (PWM 1 mode, PWM 2 mode & PWM 3 mode) and ensure they are all set to “MANUAL.”
NB: Make sure you tick the remember it box and click the OK button.
Step 3: Set Up Your Automatic Fan Control
Head to the “speeds” tab after clicking the Configure button to set the minimum and maximum RPM for your fans.
Once you have this sorted, click the Fan Control tab and set up an ideal temperature curve for your CPU fan.
- How To Reset BIOS Password [Solved] | Tech Consumer Guide
- 7 Solutions to CPU Over Temperature Error in 2022
This step will help you monitor whether the changes you’ve made have any impact.
You can choose to start any demanding application to test how these changes perform.
Make sure you save all these changes; otherwise, you will have to repeat this process every time you restart your PC.
Lastly, click the “Temperatures” tab so as to set up when your CPU fan speeds up or slow down based on how hot the CPU gets.
Make sure you choose which sensor should control your CPU fan. Once you check this sensor, you’ll note that there are two options (Desired and Warning) at the bottom of the window.
Now use the arrow buttons to set your “Desired” temperature and “Warning” temperature. Click OK when you’re done.
That is how you change Fan speed in SpeedFan. Remember that this software might not support all PCs. If SpeedFan fails to work on your computer, then you can opt for the option below.
Use External Fan Controllers
Have you exhausted all the options and you are still wondering how to lower CPU fan speed?
Well, you should consider trying an External Fan Controller. Having a controller for your fans allows you to monitor the temperature of your PC and manually adjust the speed of your fans.

As long as you have one of the best pc fan controllers, you will help your system achieve the perfect balance of quiet and cool.
Before you decide to shop for a PC fan controller, make sure you consider its aesthetics, pin support, controls, and channels.
There are so many external fan controllers in the market, but none beats the performance, versatility, and functionality of Corsair Commander Pro, Thermaltake Commander, and Noctua.
Frequently Asked Questions
Below are some of the questions that most people ask about CPU fan speeds:
What Causes Computer Fan To Speed Up?
High temperatures or a faulty heat sensor are the main causes of high RPMs.
In most cases, the processor will heat up when you are running certain applications, thus triggering the fans to speed up.
You can lower the fan speed using SpeedFan or manual fan controllers.
What Is Good Fan Speed?
Well, there is no definite answer to this question. All you need to ensure is that your RPMs are not so high or too low.
Higher RPMs are noisier while low RPMs might cause your CPU to overheat. The CPU fan speed should be sufficient to maintain the temperatures of your processor within its safe zone.
Wrapping Up
Having a good set of fans will prevent your computer from overheating. Unfortunately, they can also make your PC sound like an airport.
To avoid such a scenario, make sure you are using a pc fan controller or SpeedFan. These solutions will help you control your CPU’s fans for superior cooling when it is doing a lot of heavy lifting.
Besides, they will also lower the fan speed when the need arises. That’s it on how to change the CPU fan speed without BIOS.
You Might Also Like
- 4 Methods on How To Turn Off Laptop Fan [Solved]
- Why Is My Gaming Computer So Slow? 5 Major Reasons and How To Solve It
- How To Solve Why Are My GPU Fans Not Spinning
- Underclocking GPU and Undervolting GPU? 3 Benefits On Why You Should Do It
- How to Monitor CPU and GPU temperature Windows? [5 Methods]
- How To Solve An Acer Predator Helios 300 CPU Fan Not Working
- Safe CPU & GPU Temperatures For Laptop When Gaming?
- How To Disable CPU Throttling? [6 Best Solutions]
- What Is GPU Throttling And How To Fix It?
- Is Overclocking Safe? Pros and Cons of Overclocking CPU or GPU
- 4 Methods on How To Fix CPU Fan Error on Boot But Fan is Running